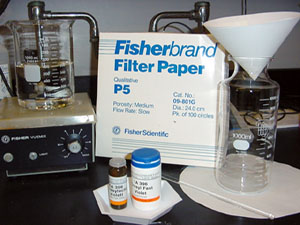
This manual explains the process of embedding brain tissue in 12% celloidin, cutting the tissue with a microtome, staining and coverslipping the brain sections, the images of which are then posted on the internet for research purposes. (For more information on the scope and purpose of the Mouse Brain Library, visit the MBL Homepage.) There are various methods of tissue embedding and coverslipping that produce the same result, but the detailed procedure described in this manual is the protocol currently used at the MBL.
All brains in the MBL originate in the laboratory of Dr. Robert W. Williams.at the University of Tennessee Health Science Center in Memphis and are processed in our laboratory at Beth Israel Deaconess Medical Center in Boston, Massachusetts. These brains arrive in Boston in batches of 100 formalin-filled scintillation vials. This manual hereby describes the detailed protocol from the time these mouse brains are received.
 |
The mouse brains are dehydrated one box (of 100 brains) at a time. Since the brains arrive immersed in formalin, they need to be cleaned before fully dehydrating the tissue. The dehydration process consists of 6 steps, one step per day starting on Monday, and two steps on Friday. |
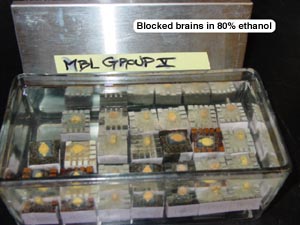
1. Monday: dH2O—Prepare an empty storage box alongside the box of 100 scintillation vials (Fisher Scientific, #03-340-25N) filled with formalin. The vials with formalin are labeled with the brain’s identification number. Make sure that the brain stays in the vial while pouring the formalin from the vial into a large beaker (1000 ml capacity). With the formalin removed, fill the vial with dH2O. Place each vial into its corresponding compartment in the empty box, maintaining the arrangement of vials as dictated by the original box from the University of Tennessee (i.e., they should follow consecutive numerical order).
2. Tuesday: 80% ethanol—Repeat step 1, but replace the dH2O ethanol with 80% ethanol.
3. Wednesday: 95% ethanol—Repeat step 1, but replace the 80% ethanol with 95% ethanol.
4. Thursday: 100% ethanol—Repeat step 1, but replace the 95% ethanol with 100% ethanol.
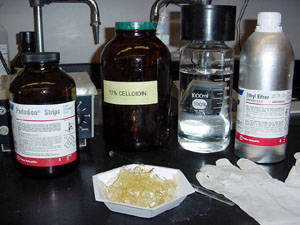
5. Friday morning: Ether-ethanol—Repeat step 1, but replace the 100% ethanol with a 1:1 solution of ethyl ether and 100% ethanol.
| Note: Ethyl ether is highly explosive and can cause irritation when inhaled. Open the ether canister away from your body, as its contents are under pressure. In making the ether-ethanol solution, always pour the ethanol first and always work in a fume hood. |
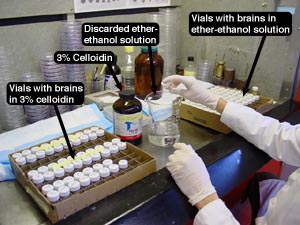
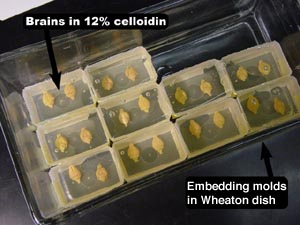
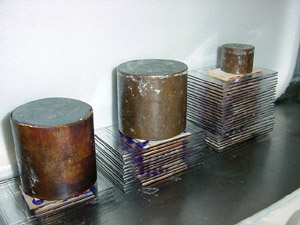
6. Friday evening: 3% celloidin—Repeat step 1, but replace the ether-ethanol solution with 3% celloidin (pictured above).
The brains should remain immersed in 3% celloidin for at least one week.
When the last 20 brains (from a box of 100) is being embedded in 12% celloidin, the dehydration process for the next box of 100 brains begins.
![]()
Twelve percent celloidin is less viscous than 3% celloidin and dries quickly in contact with air. When celloidin dries out too quickly, air bubbles form within the solution and around the embedded brain tissue, which makes the subsequent steps—cutting and coverslipping—more difficult. Therefore, following this procedure in a timely manner will minimize the occurrence of air bubbles and will produce good-looking brain sections as the final product.
| From this point onward, it is assumed that 20 brains are being processed at any one time. |
 |
|
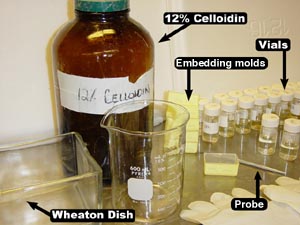
1. Gather 10 embedding molds (40 x 22 x 20 mm; Thermo Shandon, #1841)—each embedding mold can fit two mouse brains. Label the molds with tape and write—in pencil, since ethanol will dissolve pen ink—the brain’s identification number and how it will be cut with the microtome (“H” for horizontal and “C” for coronal).
It is easy to maintain the ordering of consecutive ID numbers (i.e., the two brains occupying one mold are consecutively numbered), but this ordering is not crucial so long as each brain can be correctly identified.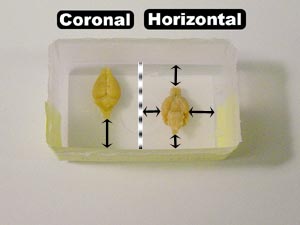
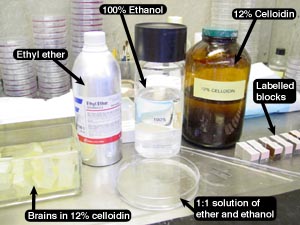
2. Using the picture to the right as a guide, gather the necessary materials and set up in a fume hood. Taking two vials at a time, empty the 3% celloidin from each vial into a large beaker (1000 ml capacity). Place each brain into the appropriately-labeled half of the embedding mold. Horizontally- and coronally-cut brains are positioned differently in the mold (to provide for a sufficient blocking base, described in step 5 under the ‘Blocking’ section), so take note of each brain’s positioning in the picture on the right:
3. Once the two brains are properly positioned, completely fill the embedding mold with 12% celloidin. As the celloidin is being poured, the brains will move around a little—reposition the brains carefully with a probe.
4. Place the celloidin-filled embedding mold into a large glass Wheaton dish (80 x 200 x 105 mm) and cover. It is important to keep the cover on the dish whenever possible in order to prevent the celloidin from hardening too quickly at this point.
5. Repeat steps 2 through 5 for the remaining brains in the group. Remember to work relatively fast to reduce the exposure time of celloidin to free-flowing air.
6. Once all 20 brains are in the embedding molds and arranged in the Wheaton dish (shown below left), the dish needs to be sealed off with tape. The goal is to create an air-tight seal (as well as tape allows), so add extra layers of tape (shown below right).
 |
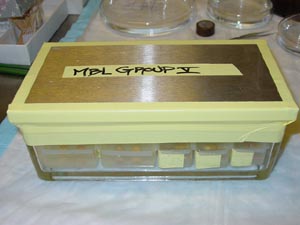 |
7. Leave the Wheaton dish in the fume hood for 24 hours and try not to move the dish unnecessarily.
8. After 24 hours, remove the tape and open the Wheaton dish. Make sure that the brains are properly positioned in the molds—you’d be surprised at how much they move overnight—and allow the celloidin to harden for 10–15 minutes. Closely monitor the celloidin to prevent over-drying. When the celloidin becomes hard enough—a good indication is when the celloidin does not stick to the probe upon puncture—fill the glass container with 80% ethanol and cover the Wheaton dish (no need to seal) and let sit for at least 48 hours.
| Although a single person can carry out this procedure, we find it easier with two individuals working side by side. It is important to consider that, during this part of the process, the mouse brains are exposed to air and dry out rapidly with exposure. The same applies to the 12% celloidin as well. Therefore, while one person performs steps 1 and 2, the other person completes steps 3 and 4. |
![]()
This part of the process prepares the brains in a manner such that they may be cut with a microtome. The brains are removed from the embedding molds, the hardened 12% celloidin around the brains is trimmed appropriately, and the brains are mounted on embedding blocks.
 |
|
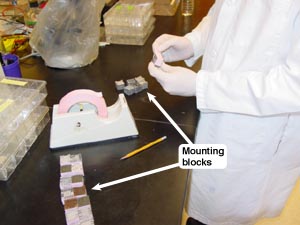 1. Gather 20 embedding blocks (25 x 25 x 19 mm; Thermo Shandon, #8042). The ‘teeth’ on the top of these blocks tend to break off over time, in which case we use blocks with the center teeth missing for coronal cuts, and intact blocks for horizontal cuts. Coronal cuts have a larger celloidin base than horizontals—a detail described in step 5—and can be recessed in an embedding block.
2. Label each embedding block with tape, and write—in pencil, since ethanol will dissolve pen ink—the brain’s identification number and how the brain will be cut (“H” for horizontal, and “C” for coronal).
3. Following the above picture, gather the necessary materials and set up in a fume hood. In a glass Petri dish, make a 1:1 solution of ethyl ether and 100% ethanol. The solution shouldn’t be deeper than 7 mm so that only the base is submerged—in a Petri dish with a 275 ml capacity (22 mm in height, 143 mm in diameter), we use 50 ml of each.
| Note: Remember the cautionary note about ether, and always pour ethanol before ether. |
4. Select an embedding mold from the Wheaton dish and remove the celloidin-encased brains. The celloidin should feel rubbery yet somewhat hard.
5. Carving the brains from the block of celloidin will require a sharp (if not new) razor blade. Start by cutting the block of celloidin in half so that each brain can be cut individually—don’t lose track of which brain is which!
Carve the brain according to how it will be cut on a microtome: brains cut on the horizontal plane begin with the dorsal side, and brains cut on the coronal plane begin rostrally (therefore, note that they are carved differently). Accordingly, there needs to be an ample base in order to attach the brain to an embedding block and still have enough room to cut the entire brain on a microtome. Following the picture below, carve horizontally-cut and coronally-cut brains appropriately:
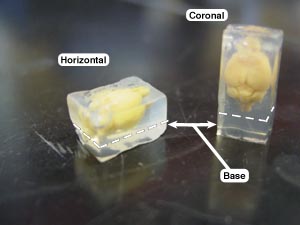
| Note: If the base is too short, the microtome blade may start cutting the embedding block before the entire brain is cut—doing so damages the blade. |
6. Once a brain is carved, place the block of celloidin (containing the brain) in the Petri dish with the ether-ethanol solution (as shown below). Leave in place for about one minute. Only the base should be immersed in the solution since the ether slowly dissolves the celloidin—the higher concentration of ethyl ether in solution, the faster it dissolves the celloidin. 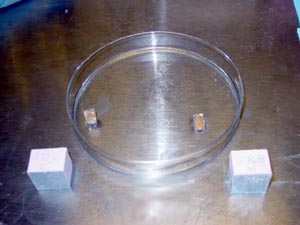 The goal is to soften the celloidin just enough to help it ‘glue’ the brain to the embedding block.
7. Choose the correctly-labeled embedding block—with an ID number matching the one on the embedding mold—and put a dab of 12% celloidin (from its jar, not the hardened celloidin) on the top surface. Remove the brain from the Petri dish and place it on the block. The brain’s orientation on the embedding block is not of extreme importance, as long as the base is the surface adjoined to the block. Allow the 12% celloidin to dry for a minute or two.
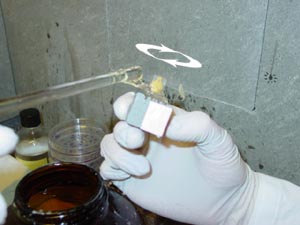
8. The brain is not secured to the block quite yet—it needs reinforcement. Use a glass rod to retrieve a substantial amount of 12% celloidin, and wrap the celloidin around the brain as it drips from the glass rod as shown below:
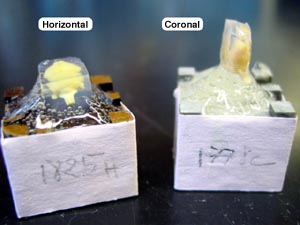
 9. Let the ‘glued’ block sit for 2–5 minutes. Take care in not letting the celloidin encasing the brain dry out, but also keep in mind that the bond between brain and block must congeal properly. Check the bond’s firmness by wiggling the brain with your finger—when the brain moves only slightly if at all, the bond is set (shown below left).
10. Place the finished block back into the Wheaton dish (shown below right). The brain should be completely submerged in the 80% ethanol (add more ethanol if necessary).
11. Repeat steps 4 through 10 for all remaining brains. Again, remember to track each brain with its ID number—it is especially easy to lose track during this part of the process.
12. Once all 20 brains are mounted on their embedding blocks and submerged in 80% ethanol, cover the Wheaton dish and let sit for at least 24 hours.
 |
 |
| Note: Prolonged contact with air dries out and hardens celloidin. This becomes problematic later in the process, because hard celloidin is far more difficult to manage than celloidin that has been properly cared for. It can lead to uneven cutting, curled sections, and uneven staining, to name a few problems. Therefore, when possible, it is best to keep celloidin in an ethanol solution. Also, ethanol evaporates quickly, so be sure that the level of 80% ethanol in the Wheaton dish never falls below the top of the blocked brains.
As with the procedure under the 12% Celloidin section and for reasons just mentioned, we find it easier with two individuals working side by side. While one person performs steps 4 through 6, the other completes steps 7 though 10. |
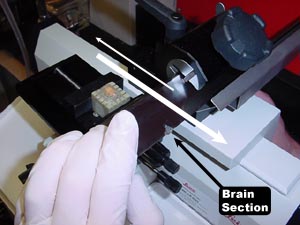
![]()
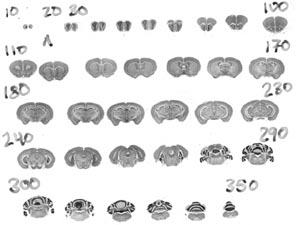
After 24 hours of being immersed in 80% ethanol, the blocked brains are prepared to be cut with a microtome. After properly securing the block in the microtome, the brain is cut into 30 µm–thick sections. In total, a coronally–cut mouse brain yields 280–350 sections and a horizontally–cut brain yields 120–180 sections. These sections are sorted into a tissue collection box (or, a partitioned box), where they are consecutively ordered across 10 partitioned compartments (described in detail under step 11). The cutting procedure terminates once the entire brain is cut—a coronal cut takes 30–40 minutes and a horizontal cut takes about 15–30 minutes—and each section is appropriately placed into the collection box.
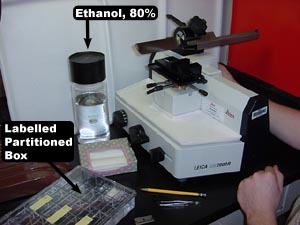 |
1. Select a tissue collection box (6x6 partitions; Brain Research Laboratories, #6636). Label it with tape and write down—again, in pencil—the identification number of the brain to be cut. A partitioned box fits 3 whole brains (5 x 2 compartments for each brain), so label accordingly. 2. Fill the compartments (to be used) with 80% ethanol. Fill almost to the brim, because the ethanol will evaporate over time, particularly from the compartments on the perimeter of the box. |
| A Note About the Following Steps: We have two different microtomes available for use at the MBL. We usually only use one of them (a Leica), but we use the other (an AO 860) on occasion. For these reasons, the cutting procedure will follow as if a Leica microtome is being used. At the end of this section, however, there is an important note about using an AO 860 microtome in the event that you use this model. |
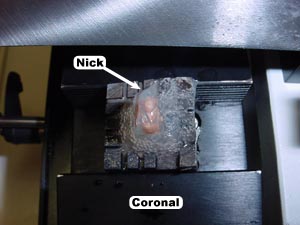
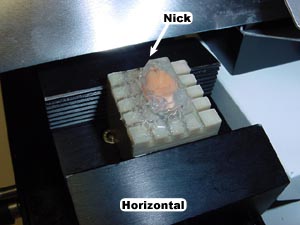
3. Secure the block tightly in the stage clamp. The brain’s orientation on the stage is important: for a coronal cut, the brain’s left hemisphere is on the leading edge of the block, and the olfactory bulbs are on the leading edge for a horizontal cut. Always make sure that the height cylinder is lowered (i.e., the top of the celloidin block is lower than the cutting plane of the microtome blade) to avoid cutting the brain inadvertently during calibration.
| Note: With the block now removed from the Wheaton dish, it is important to keep the celloidin wet with 80% ethanol. As noted before, dry, hard celloidin is very difficult to work with and will produce poor results. We suggest filling an unused compartment in the tissue collection box with 80% ethanol and using your finger to wet the celloidin when necessary. |
4. Orient and level the brain by adjusting the x- and y-axis orientation screws. For coronal cuts, align the plane of the brain’s longitudinal fissure with the plane of the blade’s leading edge—when level, the two axes should be perpendicular (shown below left). Similarly for horizontal cuts, align the longitudinal fissure with the blade (shown below right). When the brain is properly leveled, lock the orientation lever.
| Note: Brains, of course, are not perfectly symmetrical, and accurate leveling will take some practice. You may have a better understanding of this calibration by looking at sample sections in the Mouse Brain Library. |
 |
 |
5. Confirm that the adjustment knob for section thickness is set at 30 µm—MBL brains are always cut at 30 µm.
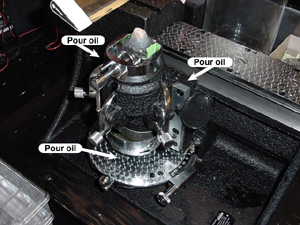
 6. Remove the blade guard and carefully remove the oil from the blade with a tissue. When the microtome is not in use, oil should always be placed along the blade’s edge to prevent it from rusting. The microtome is now ready to be used.
7. In order to distinguish the brain’s left hemisphere from its right, make a notch (or, ‘nick’) in the celloidin with a razor blade. For coronally-cut brains, the nick is positioned over the left hemisphere (shown above left) and in the left-anterior corner for horizontally-cut brains (shown above right).
8. Begin cutting. The top surface of the celloidin will start to flatten relative to the cutting plane, and the first few intact sections will be (or should be) devoid of brain tissue. Look at the size of the section—estimate how large the perimeter of celloidin will be around the brain tissue and carefully trim the celloidin block with a razor blade. There should be a space of at least 300 µm between the brain’s cortex and the edge of the celloidin.
| Note: Be careful not to trim too close to the tissue! Also, do not trim the entire block of celloidin at the start—this is a process that should be done at various points throughout the cutting procedure. The perimeter of celloidin that is left around the brain depends somewhat on the quality of the celloidin. The 300-µm perimeter is a rule of thumb for flawless celloidin; celloidin containing air bubbles should be trimmed differently. The goal is to cut sections that will be easy to manage during the coverslipping process. Accommodate for the air bubbles and tailor the sections to your personal handling techniques—we find that sections with straight, defined edges are easier to handle than sections with jagged edges. Additionally, sections with large perimeters of celloidin are difficult to manage during coverslipping |
9. Keep cutting the celloidin until you reach brain tissue—that section will be the first one you place into the first compartment in the tissue collection box.
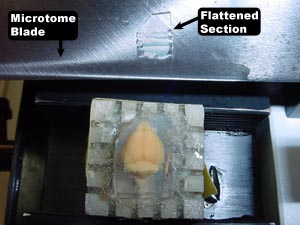
10. Flatten each section on the microtome blade (shown below) prior to placing them into the appropriate compartment of the partitioned box.
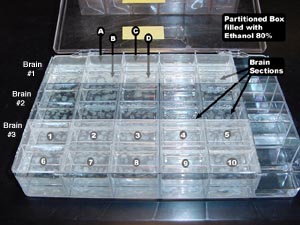
11. As mentioned, the sections are consecutively ordered across 10 partitioned compartments in the tissue collection box. For example, the box pictured below is full—it holds a total of three brains, and the numbered compartments indicate the compartments occupied by the third brain. Each compartment contains every tenth section, such that the first section is placed in the first compartment, the seventh section into the seventh compartment, the 11th section back into the first compartment, the 18th section into the eighth compartment, and so forth.
| Note: Be sure to order the sections properly—only four of the 10 compartments are used for the purposes of the MBL and it is important that each compartment contains an equally-representative sample of the brain. The four compartments used, A, B, C, and D (shown below), correspond to compartments 2, 7, 3, and 8, respectively. |
 |
 |
12. Repeat steps 1 through 11 for all remaining brains.
13. When finished, clean the microtome: wipe up excess celloidin and ethanol; carefully clean the blade with a tissue; place some oil on the blade; replace the blade guard; cover with its plastic cover.
|
 |
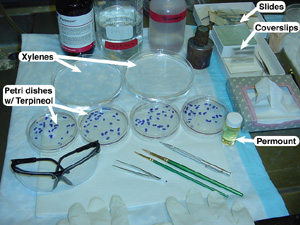
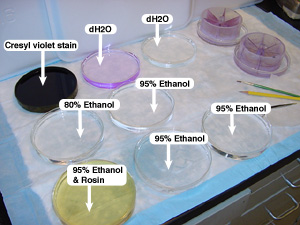 1. Set up glass Petri dishes (22mm in height,143mm in diameter) and fill with the proper solutions according to the picture to the left. Follow the recipe for the cresyl violet stain. The rosin-95% ethanol
solution is at a ratio of about 1:25, such that it appears pale yellow in color; this proportion does not need to be exact and will be
accommodated for in step 5.
1. Set up glass Petri dishes (22mm in height,143mm in diameter) and fill with the proper solutions according to the picture to the left. Follow the recipe for the cresyl violet stain. The rosin-95% ethanol
solution is at a ratio of about 1:25, such that it appears pale yellow in color; this proportion does not need to be exact and will be
accommodated for in step 5.
2. In addition to the eight staining dishes, fill two other Petri dishes with distilled water (dH2O). These two dishes will be used to re-hydrate the brain sections as they are placed into circular staining nets (or, partitioned wheels). An 8-compartment wheel (Brain Research Laboratories, #6115) is used for coronal sections and a 4-compartment wheel (Brain Research Laboratories, #8115) is used for horizontal sections—given the larger cross-section of horizontal sections, larger compartments are needed to provide for even staining and proper handling.
3. Two coronally-cut brains can be stained at once whereas only one horizontally-cut brain can be stained at a time. As mentioned before, for each brain only four of the 10 compartments in the tissue collection box will be used.
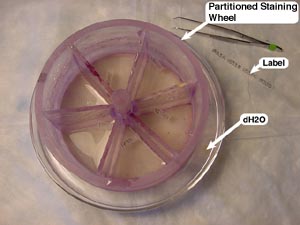 To keep track of each compartment, make labels (using tracing paper and a pencil) with the brain’s identification number and compartment designation (i.e., for brain number 1734, create labels for 1734A, 1734B, 1734C, and 1734D). Place each consecutively ‘numbered’ label into adjacent compartments in the staining wheel.
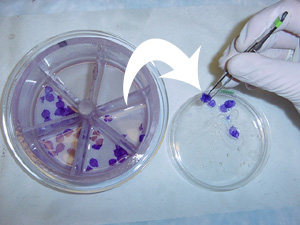
4. Taking the appropriate tissue collection box, carefully scoop the sections with forceps (as opposed to pinching them, which can tear the sections) from the partitioned box and place them in the appropriate staining compartment. Be sure to remove all sections from the tissue collection compartment.
5.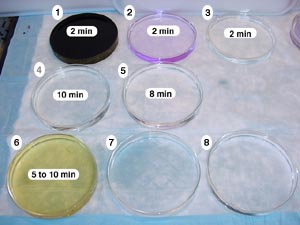 Once the staining wheel is labeled and contains the corresponding brain sections, it may be placed in the first staining dish containing the cresyl violet stain. The partitioned wheel follows a schedule—the time and order in which the wheel passes through each staining dish is indicated in the picture to the right. The time spent in the 6th dish depends on the solution’s concentration of rosin: the higher the concentration, the faster it will remove the
excess stain from the sections. Creating well-stained sections takes practice—the sections should be removed from the rosin-ethanol solution when there is pronounced regional differentiation (e.g., white matter versus the denser tissue of the hippocampus). There is no time
allotted for dishes 7 and 8, as these are simply used to wash the rosin from the sections.
Once the staining wheel is labeled and contains the corresponding brain sections, it may be placed in the first staining dish containing the cresyl violet stain. The partitioned wheel follows a schedule—the time and order in which the wheel passes through each staining dish is indicated in the picture to the right. The time spent in the 6th dish depends on the solution’s concentration of rosin: the higher the concentration, the faster it will remove the
excess stain from the sections. Creating well-stained sections takes practice—the sections should be removed from the rosin-ethanol solution when there is pronounced regional differentiation (e.g., white matter versus the denser tissue of the hippocampus). There is no time
allotted for dishes 7 and 8, as these are simply used to wash the rosin from the sections.
| Note: Depending on how many times they have been used, staining dishes 7 and 8 will accumulate rosin in solution. Leaving the staining wheel in these dishes will further wash out the stain, so account for this by either prematurely removing the wheel from the 6th dish or placing the wheel in a separate Petri dish containing 95% ethanol after the sections have been thoroughly washed in dishes 7 and 8.
Also during step 5, there are techniques to ensure proper staining of each and every section: use a brush to completely submerge every section in the solution, and periodically shake the staining wheel to move the sections around a bit. Before transferring the wheel to the next staining dish, shake the wheel to rid the sections of excess solution. |
6. When the staining wheel has completed its rotation through the staining dishes, move it (in its Petri dish with 95% ethanol) to a fume hood. Here, you have finished staining the first brain, move under the fume hood and carefully scoop the stained sections out of the compartments and transfer them to a small plastic Petri dish (Fisher Scientific, #08-757-12) containing alpha terpineol (Fisher Scientific, #T31) (pictured below). Alpha terpineol preserves the sections and keeps them from drying out before they are coverslipped. Transfer the label from the staining wheel as well. Spread the sections out in the dish and carefully flatten out folded sections. Finally, stack the Petri dishes in the fume hood.
| Note: Although some sections refuse to lay flat, it is essential that the sections are flattened out to prevent problematic coverslipping. Also, be sure that the sections are completely covered with terpineol. |
7. Repeat steps 3 through 6 for all remaining brains. After numerous stainings, the solutions in each of the Petri dishes may become too contaminated with solutions in dishes that came before it. This will be noticeable when stained sections are too dark, too light, or unevenly stained. Without being wasteful, be sure to regularly replace contaminated solutions with fresh ones. Also, the cresyl violet stain becomes diluted with water, which is evident by stained sections that are too light; add new cresyl violet stain when necessary.
![]()
With the brain sections stained and flattened in the Petri dishes (in alpha terpineol), they are prepared to be mounted on slides.
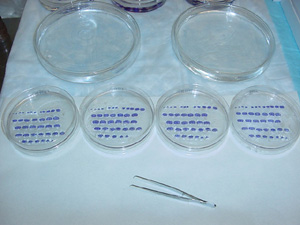
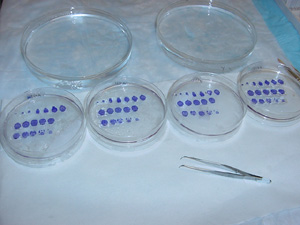
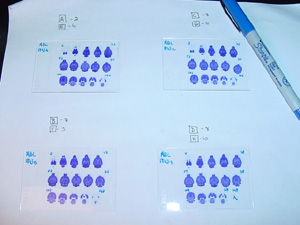
1. Set up the fume hood according to the picture to the left and gather the four Petri dishes that contain the A, B, C, and D sections of an individual brain. These sections need to be arranged in the Petri dish with respect to the order in which they were cut. It is best to order the sections in the ‘A’ dish first (since these sections were the first cut), then C, then B, and finally D. Be sure that each section is right-side up, according to the notch (or, nick) made in step 7 in the cutting procedure. As a reminder, the nick should be in the upper right corner for coronal sections and in the upper left for horizontal sections (the nick indicates the left side of the brain).
2. Once the sections in all four dishes are ordered, the dishes must be cross-checked with one another to ensure that the ordering is consistent for all sections from the brain. Since the A and C sections are respectively from the 2nd and 3rd compartments in the tissue collection box, they should look very similar, and the same is true for the B and D sections (which are from the 7th and 8th compartments, respectively). Cross-check these dishes first, then cross-check the A and C sections with the B and D sections. Discard any duplicate sections and leave a space for any missing sections.
Note: Arranging the sections in the Petri dish in the manner that they will be mounted on a slide avoids confusion. Generally, sections are mounted as follows:
It may be the case that the sections are exceptionally big or small—adjust the rows accordingly. |
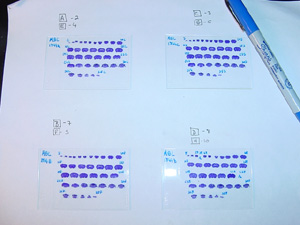
3. When the sections in each Petri dish are properly ordered (shown below), carefully move the sections with forceps from one dish to a glass Petri dish (22 mm in height, 143 mm in diameter) containing xylene. xylene cleans the terpineol (and any other chemical residue) from the sections. Keep the same arrangement of sections in the xylene dish as in the alpha terpineol dish.
 |
 |
| Note: Xylene is carcinogenic. Always wear nitrile gloves and protective glasses when you are working with xylene. |
4. Take one glass slide (75 x 50 mm; Fisher Scientific, #12-550C) and inscribe—with glass etching tool—the brain’s identification number and its compartment designation (i.e., 1734A) in the lower left-hand side.
5. Using a brush, clean the slide with xylene and let dry.
6. Using a brush, spread a thin layer of mounting medium (Permount; Fisher Scientific, SP-15) on the area to be coverslipped.
| Note: Using too much Permount at this point will cause the sections to move around when affixing the coverslip. |
7. Carefully move the sections from the xylene to the slide (shown below), maintaining the predetermined arrangement. Since xylene dissolves Permount, dab the section on a dry tissue to remove excess xylene.
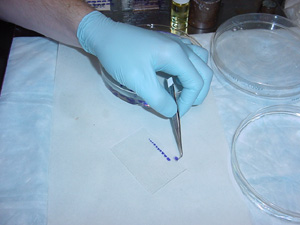
| Note: The sections on the slide will dry out if left for too long, causing tissue to crack. Keep the sections wet with xylene by lightly dabbing them with a brush (but don’t use too much xylene!). Best results are seen when this step is carried out in a timely manner. |
8. Once all sections are appropriately placed on the slide, use a brush to spread Permount on the perimeter of the area to be coverslipped and between the rows of sections. Add a drop of xylene to thin out the medium, if necessary.
| Note: Again, the amount of Permount used will affect the ease of coverslipping—using too much Permount will cause the sections to dislocate from their position, and using too little Permount will leave air bubbles under the coverslip. A good balance is achieved with practice. |
9. Take a coverslip (60x48 mm, 1 oz.; Fisher Scientific, #3334) and lay the rightmost edge a few millimeters from the edge of the slide. Carefully lower the leftmost side down to the slide, and using forceps, press gently—as coverslips are delicate—with a right-to-left motion to remove excess Permount and air bubbles (observe this technique in the QuickTime movie to the right). Air bubbles will persist throughout the Permount—it is crucial to remove all air bubbles because they tend to enlarge over time. Be wary of the pressure you exert on the coverslip, as pressing too hard will dislocate sections and potentially crack the coverslip. Mastering this technique takes practice.
10. Once the slide is properly coverslipped, remove the excess Permount around the edges of the coverslip with a brush. Stack the slide somewhere (out of hazard’s way) in fume hood with small cardboard separators (roughly 40 x 30 mm) between each slide. Cleaning the surface of the coverslip with a brush and xylene is advised so that the cardboard does not become glued to the adjacent slides.
11. Repeat steps 4 through 10 for each of the remaining three Petri dishes (i.e., B, C, and D) containing sections from the same brain.
12. Likewise, repeat steps 1 through 11 for all successive brain sections.
13. When finished coverslipping for the day, place a heavy weight (1000 g) on the stack of slides (also with a cardboard separator; shown below).
If the weight is replaced on the stack each time a slide is added, the constant change in pressure is likely to create more air bubbles underneath the coverslip.
 14. Let the stack of slides sit for at least 48 hours under the heavy weight.
15. After 48 hours, clean the slides with a brush and xylene. Clean the excess Permount from the slide using xylene in one small Petri dish (80 ml capacity; 22 mm in height, 94 mm in diameter), and wipe clean with a tissue. For the final cleaning, use another small Petri dish filled with xylene to clean both sides of the slide (the xylene in the first Petri dish becomes too contaminated with Permount to fully clean the slide). Handle the slides with care, as pressing too hard on the coverslip can cause it to slide around.
16. Stack the cleaned slides as they were previously stacked in step 13, except that a light weight (200 g) is placed atop the stack when finished. Let sit for at least 48 hours.
17. After 48 hours, check the slides—some may contain air bubbles. If the air bubbles are small and occupy the perimeter of the coverslip, it may be easy to remove the bubble with a dab of permount—the small space seems to sufficiently ‘sap up’ the Permount. If the air bubbles permeate brain sections or are simply too large, the slide needs to be re-coverslipped. Coverslips that have been cracked need to be re-coverslipped as well. However, slides that contain no defects whatsoever can be stored for 3 weeks in a box—document the time they are stored for future reference.
16. After 3 weeks, check the condition of the slides again and properly correct any defects. The slides that are in good condition can be numbered: with a permanent marker, write the brain’s identification number and its compartment designation in the upper left-hand corner (i.e., 1734A), and number the first and last sections of each row (shown below). In addition, label any missing sections as well as the adjacent sections to avoid confusion as to which section is which. Remember that for ‘A’ sections, the first section will be the 2nd section cut, so label it with a ‘2’. Subsequently, each consecutive section will be every 10th section cut. So if the section at the end of the first row is the 5th section on the slide, it should be labeled ‘52’. Sections should be labeled accordingly: each compartment, A, B, C, and D, respectively correspond to the 2nd, 3rd, 7th, and 8th sections cut and every 10th section thereafter.
 |
 |
17. While numbering the sections on each slide, take note of the following information for each brain:
Slide number:
Symmetry (with respect to right and left hemispheres): [Poor, Fair, Good, Very Good, or Excellent]
Missing sections: [yes: 12 in A, 303 in C…]
Possible “cutting notes”:
Inconsistent section thickness?
Sections mounted with the nick on the wrong side?
Possible “histology notes”:
Missing tissue? [yes: 93 in C (torn in handling), 67 in B...]
Olfactory bulb missing?
Damaged brain? [yes: damage sustained to cerebellum during perfusion]
Faded or uneven staining?
Sections with tears or cracks? [yes: 22 in A, 53 in B (tissue dried out), 88 in D (torn in handling)...]
18. Enter information from step 17 in the appropriate database. At the MBL, we created a specialized database with File Maker Pro.
![]()
All sections that are cut with the microtome are not coverslipped. Since only compartments 2, 3, 7, and 8 from the tissue collection box are used, there are 6 remaining compartments with brain sections that need to be placed in long-term storage.
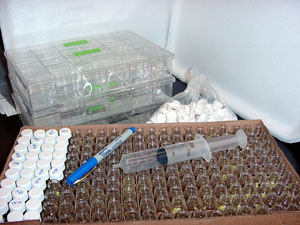 1. Gather the tissue collection boxes with unused brain sections, a box of small
scintillation vials with caps (200 per box; Fisher Scientific, #03-337-26), and other necessary materials (shown right).
1. Gather the tissue collection boxes with unused brain sections, a box of small
scintillation vials with caps (200 per box; Fisher Scientific, #03-337-26), and other necessary materials (shown right).
2. Place a small piece of tape around each vial and label with the brain’s identification number and its compartment number (i.e., 1734-6). With a large syringe, fill the vials with 80% ethanol—simply use the ethanol from empty compartments in the tissue collection box.
3. Scoop the sections from the compartment in partitioned box and place them in the appropriately-labeled vial. Tightly seal the vial and place in consecutive order in the storage box.
4. When all sections are removed from a tissue collection box, properly dispose of the ethanol and rinse the container.
5. Repeat steps 2 through 4 for all remaining sections in each tissue collection box.
6. When finished, place the box of vials in a refrigerated room.
![]()
Cresyl violet (CV) stain should be made in the morning—it takes 4–5 hours to dissolve the cresylechtviolett and 30–60 minutes to filter the solution.
 |
Recipe:
|
1. Fill a beaker (1000 ml capacity) with 600 ml of distilled water (dH2O).
2. Measure out 3 g of cresylechtviolett and pour into the beaker.
3. Using a stirrer with a magnetic stir bar, dissolve the cresylechtviolett in the beaker. Let the solution stir for about 4.5 hours.
4. Slowly filter the solution through filter paper (Fisher Scientific, #09-801G) into another beaker (1000 ml capacity). Pour the solution in 150 ml increments and change the filter paper often (three times is usually enough).
5. When the solution is completely filtered, seal the beaker.
Celloidin should be made in the morning early in the week—the bottle containing the solution needs to inverted many times a day in order for it to be completely mixed in 4 or 5 days. Scrapped 12% celloidin from the blocking process can be used to make more 12% celloidin, as long as it is uncontaminated. However, no more than half of the total quantity of celloidin called for in the recipe should be old or used celloidin.
 |
Recipe:
|
1. Measure out the appropriate amount of old celloidin and parlodion strips. Place them into a large jar (at least a 2000 ml capacity).
2. Measure 750 ml of 100% ethanol using a graduated cylinder and pour into the jar.
3. Measure 750 ml of ethyl ether using a graduated cylinder and carefully pour into the jar.
4. Seal the jar and periodically flip it over throughout the day and throughout the week.
| Note: Do not shake the jar. Ethyl ether is highly explosive and should not be violently shaken. |
Reuse old 3% celloidin as much as possible—new 3% celloidin can be made when either the old solution is used up or the solution becomes too contaminated (it becomes ‘cloudy’). The recipe closely resembles that of the 12% celloidin. Celloidin should be made in the morning early in the week—the bottle containing the solution needs to inverted many times a day in order for it to be completely mixed in 3 or 4 days.
Recipe:
1. Measure out 22.5 g of parlodion strips and place in a medium-sized jar (1000 ml capacity—the empty parlodion bottles are the perfect size).
2. Measure 375 ml of 100% ethanol using a graduated cylinder and pour into the jar.
3. Measure 375 ml of ethyl ether using a graduated cylinder and carefully pour into the jar.
4. Seal the jar and perform steps 1 through 3 to make another jar (we make two jars of new 3% celloidin at a time).
5. Periodically flip the jars over throughout the day and throughout the week.
| Note: Do not shake the jar. Ethyl ether is highly explosive and should not be violently shaken. |
Rosin only takes about 15 minutes to make. Shaking the mixture will quicken the time it takes to dissolve the rosin, but it will eventually dissolve if the solution is just left to sit.
Recipe:
1. In a small beaker or jar (200 ml capacity), simply mix the rosin and the ethanol.
![]()
In order to ensure that the microtome is cutting sections at 30 micrometers (µm), it is necessary to measure the section thickness of sections that have already been mounted on slides. Although four slides are produced from one brain, only one of the slides is measured for section thickness. Ten measurements are made on 10 different sections from each slide. It takes practice to accurately measure section thickness.
1. Turn on the measurement device (Heidenhain VRZ-404 Counter, Heidenhain MT-12B/MT-25B Digital Length Gauge), and turn on microscope (Carl Zeiss).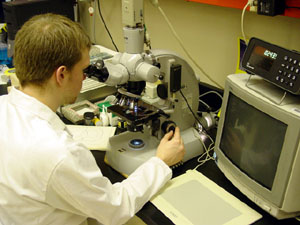
2. Position slide on microscope stage and focus with yellow lens.
3. Push top light condenser (underneath stage) away from you, place immersion oil on slide, and switch to the "100x" objective lens.
4. Begin focusing beyond the section and bring the focus onto the first [layer of] cells that appear well-defined.
5. Press the reference button twice (“REF”) on the counter.
6. Bring the focus toward you and the section and return the focus back onto the first [layer of] cells that appear well-defined.
7. The number displayed on the counter is in millimeters (mm)—mentally move the decimal three places to the right, and the number will be in µm. Round off to the nearest µm and write this number down.
8. Repeat steps 4 through 7 for nine other sections on the same slide.
9. Repeat steps 2 through 8 for as many slides as necessary.
10. Clean up: wipe immersion oil from lens with a lens tissue; use lens cleaner on a Q-tip to clean the100x lens; wipe excess oil from slide and use glass cleaner to fully clean slide.
11. Turn off microscope and measurement device, and replace the protective cover back on microscope.
12. Enter section thickness measurements into the database.
![]()
— Last updated January 27, 2003 by Boris Diechtiareff and Chris Pung —