
Aria 3-D allows you to download and analyze image stacks. You can select stacks from our growing library of images or you can use Gumbo to create your own. No registration is necessary to view images from our library, but if you want to be able to control the microscopes, create your own stacks, and customize your jobs, you must register.
When Aria starts up, you will see a window that resembles this one:
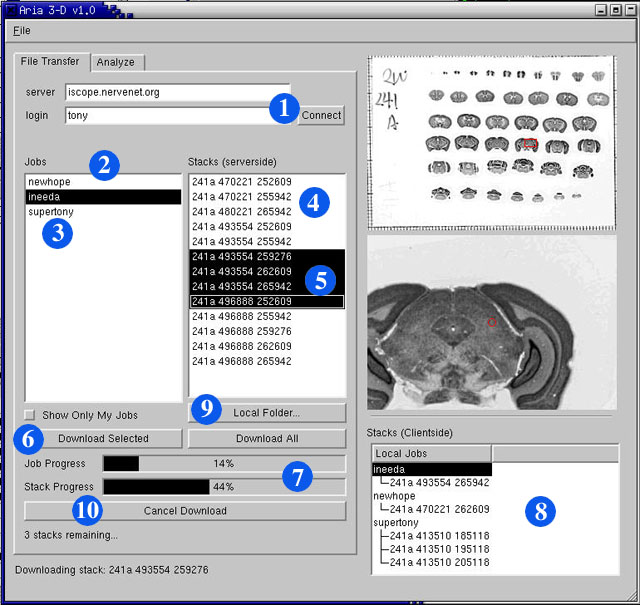
In this window you can browse and download stacks from the iScope server. When you set up stack downloads in Gumbo, you create a "job". A job consists of one or more image stacks. One of Aria 3-D's main functions is the retrieval of these image stacks. Here is and outline of the steps necessary to download a job:
- Connect to the iScope server by clicking the "Connect" button.
Please note that you have to enter a login only if you want to filter out the jobs you created from all of the jobs currently stored on the server.- A list of available jobs should now appear in the "Jobs" box.
This is a list of all jobs currently stored on the iScope server that are available for you to download stacks from. There will be many jobs in this box that you did not create yourself; some will be from our public library of image stacks and others will be from other users. If you want to view only your own stacks, check the "Show Only My Jobs" check box.- Click on the name of a job.
A list of stacks in the selected job will appear in the "Stacks (serverside)" box.- Click on the name of a stack.
The preview images to the right will show you the slide and location of the selected stack. If you want more information about the tissue on a slide (i.e. strain of mouse, brain weight, age, etc.), please search our Mouse Brain Library at www.mbl.org. Note, for searching purposes, that the first number and letter of the stack name are the Celloidin ID of the slide that it comes from. The second two numbers in the stack name are its coordinates on the slide.- When downloading, it is not necessary to download entire jobs; you may select specific stacks from different jobs and download them.
- Once you have selected the image stacks that you would like to download from a job, click the "Download Selected" button. Repeat this process for each job that contains image stacks you would like to download. If you would like to download an entire job, click the "Download All" button. You may download image stacks from different jobs at the same time.
- The status bars at the bottom of the tab will reflect the progress of your current download.
- When a image stack has finished downloading, its name will appear in the "Stacks (clientside)" box. All your local stacks will be arranged by the name of the job that they came from. Click on the job name in the "Stacks (clientside)" box to see a list of all image stacks from that job that are stored on your computer.
- By clicking the "Local Folder..." button, you can change the location on your computer where the stacks are saved. If you change this and do not move your existing local stacks to the new folder, Aria 3-D will not find them.
- You can cancel a download at anytime by clicking the aptly named "Cancel Download" button.
Now that you can download stacks, it is time to explore Aria 3-D's other main function: image analysis. Select an image stack from the "Stacks (Clientside)" box and then click on the "Analyze" tab. You should now see a window that resembles this:
This window gives you more information about the image stack. Once you begin to analyze the images, you will refer back to this window for information. Please note that several of the more advanced analysis features such as variable depth of focus, information about area and volume, automated counting, and database integration are still being tweaked in our lab and are thus disabled in the version 1.0 of Aria 3-D.
- The Panel at the top gives the name of the slide that is shown in the preview images to the right, the X and Y coordinates of the image stack that is currently selected, and the pixel resolution in microns per pixel. The paragraph below describes the contents of the stack and how it was acquired.
- The counting box controls at the bottom of the tab allow you to customize the type of counting box used for stereology (see the image below). To change the size of the counting box, enter a new size in either microns or pixels in the appropriate box and click the "Resize" button. If you do not want to see the counting box, uncheck the "Use Counting Box" box.
- Make sure that an image stack is selected in the "Stacks (Clientside)" box and click the "Analyze" button.
This window should now appear:
This window allows you to adjust certain aspects of the image stack. Any changes you make here will not affect the actual stored image stack.
After clicking the "Load Stack" button the entire image stack should load in the same window; the scroll bar at the bottom of the screen will indicate the progress as each image is loaded. Once it has finished, the window should now resemble this:
- The image at the top of the window is a preview image from the middle of the stack. Use this image to determine what settings you would like to use for your analysis.
- Clicking the "Clear" button will undo all changes and return all settings to their defaults.
- The "Brightness" slider allows you to adjust the brightness of the image. Its range goes from .2 to 2 times the initial brightness.
- The "Contrast" check box adds to the contrast of the image. We have found this setting to be very useful for stereology. Compare the quality of the image above to the image below; the image below has been contrast enhanced.
- The "Invert" check box inverts the image.
- The "Channels" combo box allows you to select which channels of the image are displayed.
- The "Filter" combo box allows you to simulate the placement of a red, green, or blue filter over the image.
- Once you have obtained the desired image quality, click the "Load Stack" button to load the entire image stack with these settings.
In this window, you can scroll through the image stack and place marks on the images. The images are separated by approximately 1 micron in the Z-axis, so scrolling through the entire stack is equivalent to focusing through the focal plane of the tissue in 1 micron steps. Please note that the variable depth of focus feature is disabled. In this version, it is hard coded to 1, that means that when you are viewing a slide at Z-coordinate z, all marks made in the range [z-1, z+1] will be displayed.
- Click on the scrollbar to scroll through the image stack. You can also use your keyboard's arrow buttons to scroll.
- Click and drag on the image to draw on it. Each mark will be labeled with a number of the format N.n. Where N is the absolute Z-coordinate of the mark and n is the the number of marks that have been made at the Nth level.
- To change the location of the counting box, hold down the 'c' button on the keyboard and click the location on the image that you would like the counting box to move to.
- Click on the "Clear Count" button to clear all marks that have been made at any level of the stack. A running total of all the marks made is shown the "Analyze" tab of the main Aria 3-D window (see above).
- You can change the color of the pen by selecting a new value from the "Mark Color" combo box. "Inverse"draws in the inverse of the color below the mark.
- By default the the relative Z-coordinate display starts with 0 at the top of the stack. You can re-zero the coordinate at any altitude by clicking "Zero Z" button. Now the displayed Z-coordinates will be relative to this new zero point.
- If you would like to save the current image from the stack as a normal JPEG, click the "Save Image" button. Please contact Rob Williams for citation details.
I still don't understand what something does.
Please contact us: We would like to hear about any problems or suggestions you may have for Gumbo, Aria 3-D, or the iScope. Please email either Michael Connolly or Tony Capra.