![]()
by Allison Wilkes
Dr. Rob Williams' Lab, UT Health Science Center
This notebook is for more than the documentation of the procedures performed. It is also to be used as a manual to teach anyone the techniques that I use. All aspects are explained very carefully to prevent confusion and help the learner pick up the basics. I have included different notes, hints, and suggestions.
Mouse Brain Dissections
To open the correct computer database:
—Go to Recent Applications under the colored apple.
—Open FileMaker Pro
—select "open existing file" or "open..." from the File menu
—click on the "hosts" button
—select the correct computer ("FM Graphite G4")
—select the correct database ("Brain Parts DB")
Once the program is open, be sure to view the data "as list." Scroll down to the bottom and create a new record. Type in the ID number and the correct strain, and the first brain weight should appear from the database.
Case numbers are used for identification and are placed on the top and sides of the bottles. The case number can be entered into the database to determine the strain of the specific case. The case number also identifies when the mouse was killed and preserved.
For example: Case ID# 050799.23
The first 6 numbers are the date. This mouse was killed 5/7/1999. The two numbers after the decimal indicate that this was the 23rd mouse killed on that day.
Note: Mouse perfusions are performed one day a week, usually on Wednesdays or Fridays.
It is recommended to wear gloves during all dissections. Instruments should be kept clean and sharp. Used and dull razors or scalpels should be disposed of in the "sharps" container.
When weighing the brain parts, do not touch the table! This will cause distortions from the actual weight.
Place a folded Kimwipe on the petri dish and moisten with 0.1 M PB. Smooth the Kimwipe so it completely covers the bottom of the dish. Try to keep air bubbles from forming under the wipe. Remoisten as needed. The tissue should remain moist at all times.
Remove the brain from the jar. Record the number under "case ID" and tab to the field "2nd brain weight." The strain and 1st weight should appear if the case ID number was entered correctly. Wrap the entire brain in tissue to dry any excess moisture. All parts should be dry before weighing. Place brain on scale and measure to nearest 0.1 mg.
Note: The scale will read (for example) 0.1234 g. In the computer, this should be recorded as 123.4 (in mg).
Place the brain back on the petri dish. The moistened Kimwipe should replenish some of the moisture to keep the brain from drying out during dissection.
Dissection
The first incision is made between the cerebellum and the brain stem. Be careful not to cut off any para that are attached to the cerebellum.
<insert drawing #1>
Weigh the cerebellum and record under "raw." Note how many para are attached to the cerebellum and record under "intact para." There are usually two; however, one or both may have been accidentally removed during dissection from the skull. The computer uses the number of para to compute "corr." "By" should contain the initials of the researcher performing the dissections. "Date" should be filled in with that day's date (ex. 6/20/2000).
Note: In honor of Y2K, I put in all 4 digits of the year (1999, 2000).
The photo below is the underside of the brain. Notice the dissection line to remove the brain stem.
Prying the stem from the underside on the dissection line performs the removal of the brain stem.
The brain stem can be removed either before or after the olfactory bulbs. The brain stem is not weighed due to huge variations in size. Once removed, place in the well and continue with the dissection.
While most cuts can be done with the naked eye, the olfactory bulbs should be removed under the microscope. Using a scalpel, cut along the line shown in the figure below.
<insert picture #2>
Using a razor blade and the mid-line as a guide, cut the forebrain in half. You should then have a left and a right section. Weigh each section separately. Be sure to dry each piece with a Kimwipe before weighing.
Once all pieces are weighed and recorded, place in a well and label the top with the case ID number and strain. This should be done with an ultra fine point Sharpie. Make sure to fill the well with fixative to preserve the parts.
Mouse brain sections and skulls should be refrigerated when not being analyzed. Brains should be at room temperature for accurate weight. Otherwise, well plates should be kept in an airtight container in the refrigerator or in the cold storage room.
The picture below is shown to provide more visual direction as to where dissection and incision should occur.
To avoid confusion between the left and right sides during dissection, I suggest placing the parts as shown in the drawing below.
<Insert drawing #3>
This makes it easier to separate the left and right sides and not get them confused.
Overhead of the brain:
After initial dissections, the parts are dissected to remove the hippocampus. This is suggested in the picture below.
<insert picture #3>
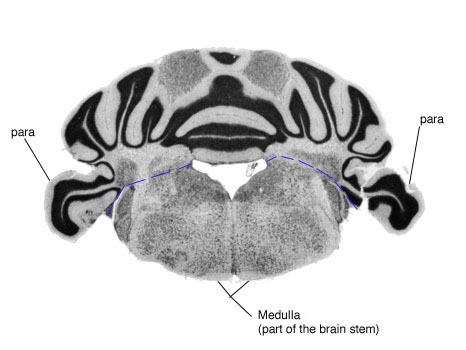
The picture below is a section of the brain as seen from slides and microscopy. It is easy to see the para on each side of the cerebellum. The dotted blue line indicates the incision made between the cerebellum and brain stem.
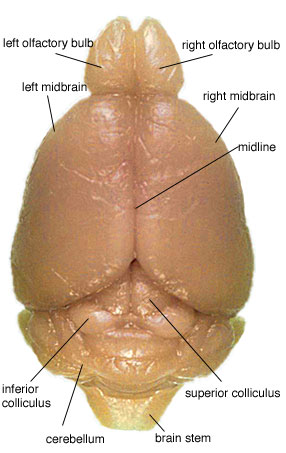
Picture #6 is an overhead photo of the brain. Notice the inferior and superior colliculi. When removing the cerebellum, do not remove the colliculi. They are to remain attached to the midbrain. They will be cut in half when separating the midbrain into right and left hemispheres.
The photo also nicely displays the midline that is used as a guide for midbrain dissection. The razor blade is placed along this line and pushed through. This cuts the inferior and superior colliculi into left and right sections.
Remember: This cut is made after cerebellum, brain stem, and olfactory bulb removal.
The optic nerve is removed and used for a classification technique.
The plate database ("Plate DB") is found in the same way as the "Brain Parts DB" described at top. However, instead of entering the "Brain Part DB," click on "Plate DB." Create a new plate ("new record") and label it with the correct information.
The MultiScreen R-5 Filtration System 48 well plates should be used to hold the optic nerves. However, these wells are too small to label with a Sharpie, which is why we use the plate database. The blank plate in the computer is used to record the ID numbers for the corresponding wells. Be sure to number and identify the plates with a permanent marker. Labels should include plate number, date, and initials of researcher.
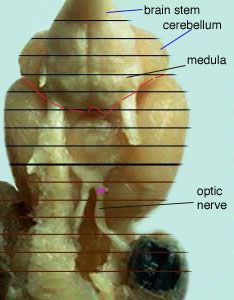
Prepare a petri dish in the manner described above. Place the brain upside down on the petri dish. The midline should be down on the tissue with the medulla facing upwards. See Picture #5.
Cut the right optic nerve close to the clump of tissue. Notice the dissection line on figure #5. Make sure to correctly label the plate with the plate database. Fill the well plates with 0.1M phosphate buffer (PB). Optic nerves should be kept in cold storage.
The right optic nerve is selected because the left optic nerve is usually absent. During initial fixation, the left eyeball is removed from the skull. This usually means the left optic nerve is missing. However, if the right optic nerve is absent and the left one is present, the left optic nerve can be used for classification. However, this should be noted on the plate database.
If both optic nerves are missing, the skull can be dissected to find a left or right optic nerve. If the skull is void of the nerve, just leave the well empty and type "no nerve" underneath the case ID number in the database. This well will be filled in at a later date.